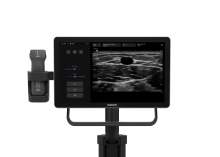
Transcript
- [Narrator] Welcome to Sonosite iLOOK,
designed for vascular access.
In this educational video,
we'll be covering performing an exam.
Tap Scan from the homepage.
If you are entering patient information,
select Patient Information at the top of the display.
You can enter patient details manually
or if the system is connected to a network and worklist,
you can select a patient from the Worklist
under the System Menu icon in the top right corner.
Make sure to save the information before proceeding.
You can add patient information during
or at the end of the scan, as long as the exam is not ended.
Simply tap the patient info field,
make your changes, and press Save.
Next, select the exam type field at the top of the screen
to display a dropdown menu.
Choose between PIV, Venous, or Arterial
to ensure optimal settings
for your type of scan or procedure.
Let's review the optimization controls.
The intuitive user interface provides quick depth
and gain adjustments using the sliders
on the left of the image.
To increase or reduce depth, use the top depth slider.
To brighten or darken the image, use the bottom gain slider.
Tap the center line icon to turn the center line on or off.
To visualize blood flow, activate color mode by pressing C.
Tap the image control panel
to view additional color controls.
Position the color box by tapping the positioning options
that become available after color activation
or simply drag your finger on the image
to move the color box vertically up, center, or down.
You can select the color type for your exam,
Color Velocity Doppler or Color Power Doppler,
as well as adjust the color scale
and gain to optimize flow visualization.
If required, you can use steering to align the color box
with blood flow direction.
To exit color mode, tap 2D.
Tap the snowflake icon to freeze the image.
Additionally, you can freeze the image
by short pressing the transducer power button.
This will also conserve power during longer procedural use.
Use the cine buffer slider
to review previous frames from the most optimal image.
Tap the camera icon to save an image to the exam.
To learn more on saving and reviewing images and clips,
see the video Sonosite iLOOK Taking Images and Clips.
For ease of use of the catheter-to-vessel ratio or CVR,
calculation automatically appears upon freezing the image
and there is no additional step of going into calculations.
To position the calipers,
tap and drag the yellow circle around the caliper
to position it accurately.
Measure the vessel diameter depending on your workflow.
You can select gauge or French
depending on the type of catheter being used.
The CVR values will then appear
in the top left of the touch display.
To save the CVR for a specific catheter,
select the gauge or French catheter size
from the respective dropdown menus.
Tap the camera button to save the image
with the measurement.
Additionally, generic calipers are available
by selecting the caliper button after freeze.
Tap the caliper icon to display two calipers on the image.
To help with accuracy of caliper placement,
you can zoom on both live and frozen images.
If the calipers are already on the screen,
you will need to delete them
with one of the delete caliper buttons in order to zoom.
To zoom in on an image,
use a pinch out gesture on the screen.
To show that the image is zoomed,
a magnifying glass icon will be displayed
at the bottom left corner of the image
and the entire image will be outlined by an orange frame.
To zoom out from the enlarged image,
pinch in on the screen or double tap the image
to return to the original image size.
To end the exam while scanning,
tap the End study button at the top right of the screen.
Then, tap End study to confirm or cancel
to return to the menu.
To end the exam from another screen,
tap the System Menu in the upper right.
The System Menu will have an orange background
if the study is active, then tap End study.
Upon completion of an exam, it is recommended
to charge the system when not in use
and to place the transducer back in the holder
to charge for maximum efficiency.
Battery status for both the system
and transducer are displayed on the screen,
indicating charge levels and warnings when low.
To charge the system, connect the AC power brick
to the system and a hospital grade AC mains outlet.
The transducer will automatically charge
when placed in the holder,
whether or not the system is connected to AC power.
The system shows a white light when fully charged
and a blinking white light when charging.
The transducer shows a white light while charging.
Battery life can be optimized by configuring power
and sleep delay settings within the system menu.
To learn more on the transducer's power and battery,
watch the Sonosite iLOOK L155 wireless transducer video.
Now, it's time for you to explore on your own.
Watch more Sonosite iLOOK how-to videos online
and refer to the system user guide on sonosite.com.
Performing an Exam
Introducing Sonosite iLOOK – purpose-built for Vascular Access:
- Lightweight wireless transducer
- Integrated charging dock
- Flexible mounting options
No unnecessary features, no clutter — just you, your procedure, and the patient.
Related videos (5)
Video
Getting Started
Video
Configuring the System
Video
Taking Images and Clips
Video