Transcript
- [Instructor] Welcome to the unboxing
and assembly video for Sonosite iLook.
We're going to show you how to unbox
and set up your new Sonosite iLook system.
Whether you've purchased the system
with the dedicated Sonosite stand
or just the system alone to mount on your own stand,
we've got you covered.
Let's get started.
First, let's unpack the main system box.
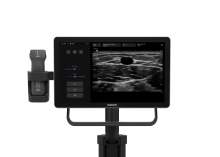
Inside, you'll find a fully assembled ultrasound system,
including the display, wireless transducer,
transducer charger, AC power cord,
cable connector, and power brick.
If you order the system without the stand,
you can mount the system
using the VESA MIS-D standard interface
with options of 75 by 75 millimeter
and 100 by 100 millimeter mounting solutions.
The stand will ship in two boxes.
Inside the stand box, you'll find the stand column,
the column insert, which is a cardboard support piece
that is important for assembly
and should not be thrown away.
The stand base, the stand arm with mount,
the tray with handle, the storage container,
the cable cover, tools and fasteners,
including a T-handle wrench,
five M6 by 30 millimeter screws,
four for assembly plus one spare,
and nine M6 by 15 millimeter screws.
Eight for assembly plus one spare.
Let's assemble the stand.
Place the stand column cord wrap side down
on the column insert.
Note the specific alignment for the column insert.
Align the stand base to the stand column
using the two locator screw heads.
Secure the stand base to the stand column
using the four M6 by 30 millimeter screws
and the T-handle wrench.
Make sure to fully tighten these screws.
Remove any temporary fasteners
holding the pre-inserted t-nuts in place.
Attach the storage container to the T-nuts
using four M6 by 15 millimeter screws.
Position the storage bin as desired
before fully tightening the screws.
Tighten the top two screws first,
adjusting the bottom T-nuts to the appropriate position.
The recommended height is 25 centimeters from the floor
to the bottom of the container.
Raise the stand upright and lock the wheels.
Partially install two M6 by 15 millimeter screws
about two thirds of the way into the two holds
closest to the handle on the bottom of the tray.
Then slide the tray over the column,
aligning the screws with the slots on the tray bracket.
Secure the screws within the slots
by pushing the tray flush to the column.
Install two more M6 by 15 millimeter screws
into the second set of holds on the tray
and fully tighten all four screws.
Before attaching the stand arm to the top of the stand,
remove the column screw.
The screw will have two attached washers.
Slide the arm down over the column
and then replace the screw.
When you slide the arm over the column,
the column will self-cap.
If you can't tighten the screw all the way in,
it is likely the arm has not been pushed all the way down.
Now let's attach the system to the stand.
You will need
to have a Phillips number two screwdriver available.
Rotate the mount on the stand arm down.
There are pre-installed screws on the back of the system
that can be used to align to the stand bracket.
These may need loosening to be able to slide them
into the top slots on the stand mount.
Place the system in the stand mount
so that the pre-installed screws rest in the slots
on top of the stand mount.
Attach the two M4 by 12 millimeter screws
to the bottom holds of the stand mount
and tighten all four screws securely
using a Phillips number two screwdriver.
If you purchase the Sonosite iLook system without the stand,
you can mount it to an alternative appropriate stand
using the standard VESA mount interface
on the back of the system.
Next, install the power brick.
Place the power brick into the holder on the stand
and connect the AC power cord
to the bottom of the power brick.
Run the power brick cable up the side channel
of the stand column.
Install the cable cover over the cable,
pressing firmly until it is flush with the stand column.
Start snapping it into place from the top
and work your way down.
Thread the system cable
through the opening between the stand arm
and the front cover of the stand arm
until the cable connector appears
at the bottom of the front cover.
Connect the power brick cable to the system cable.
Store the cable connector
by pushing it towards the stand arm and sliding it up
into the opening of the front cover.
Plug the AC power cord into a hospital grade AC mains outlet
and ensure the power brick light is on.
Place the transducer into the holder to charge it.
Allow the system to charge for four hours
before using it unplugged.
When using the battery,
keep the AC power cord wrapped around the cord wrap.
To turn on the system,
press and hold the power button one time
on the back of the display.
When powering on the system for the first time,
follow the startup wizard to configure basic settings.
Watch our configuring the system video for more information.
Thank you for watching.
Please refer to more Sonosite iLook how-to videos online
and the system user guide on Sonosite.com
for more detailed instructions.
For any questions or missing components,
please contact Fujifilm Sonosite technical support.
Unboxing and Assembly
Introducing Sonosite iLOOK – purpose-built for Vascular Access:
- Lightweight wireless transducer
- Integrated charging dock
- Flexible mounting options
No unnecessary features, no clutter — just you, your procedure, and the patient.
Related videos (5)
Video
Getting Started
Video
Configuring the System
Video
Performing an Exam
Video